
Fall is coming, and sourdough bakers far and wide are thinking about what seasonal bakes to share with friends and family. What better crowd-pleaser than a pretty pumpkin sourdough loaf! We’re keeping this one super simple, so even beginner bakers can showcase their skills this Fall. To be clear, this pumpkin loaf does not contain pumpkin, it’s just shaped like a pumpkin. What's more, we videoed the process for you. You can watch that right here, and all the information you need is below.
Ready to have a go?
Here’s what you’ll need:
- 900g basic round sourdough loaf (moderate hydration), ready for the oven - see Recipe card below
- Butcher’s Twine - we used about 8ft 8 inches
- A little oil for soaking the twine - we used avocado oil, but any edible oil will do
- Dusting flour - we used plain bread flour, but you can use rice flour for higher contrast, or a 50:50 blend of the two
- Parchment paper
- A good lame!
The Day Before.
Prepare dough for a 900g loaf using the recipe provided. Or you can use/adapt your own recipe or make a smaller loaf. That's up to you.
BAKE DAY. Turn your oven on to 450F, and preheat for an hour before you start.
Step One. Cut your twine into 4 x 26” lengths and leave them to soak in the oil for a while. The oil will stop the twine from sticking to the dough when you go to remove it.
Assuming you are using the recipe for a 900g loaf, this will give you 8 sections. The length of twine is determined by how much you’ll need to go across the bottom of the loaf, and then up and over the sides and top, with enough left over to tie.
Step Two. Take some parchment and create a 13” diameter round. You can probably ‘eyeball it’, but If you feel like you need some guidelines, fold your circle in half, then half again, and one final time to provide markings for your eight sections.
Aside from preventing any sticking to the loading peel, the parchment will also make a perfect ‘lazy susan’ for when you are scoring.
Step Three. Take your twine, and pinch-squeeze as much of the excess oil off as possible. Next, lay the twines across the parchment to mark out your 8 sections. You want to make sure that each twine has more or less the same amount of ‘overhang’ off the parchment edge, so that when you come to tie, your knot will be in the center, where a pumpkin stalk would be.
Step Four. With your dough still in its bowl or banneton, dust the top with a little flour to prevent it from sticking to the parchment and twine. Then gently flip the loaf out into your open palm and using both hands gently line it up and place it down into the center of the circle.
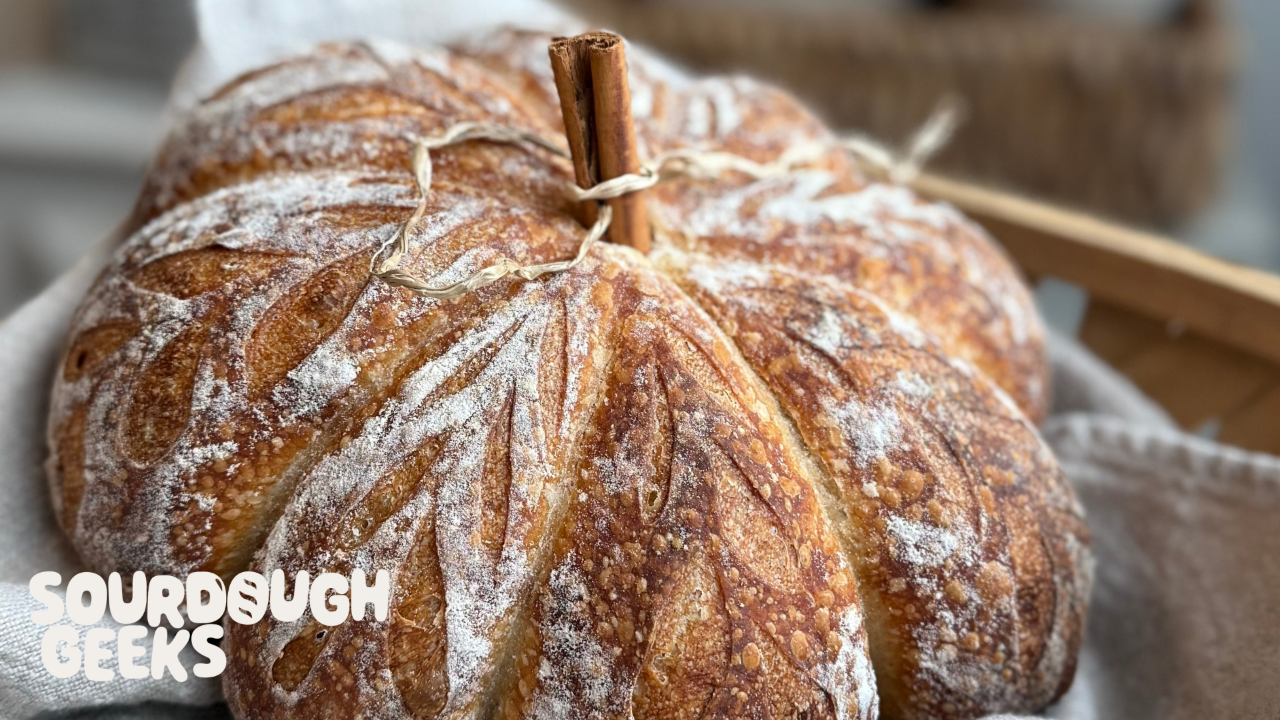
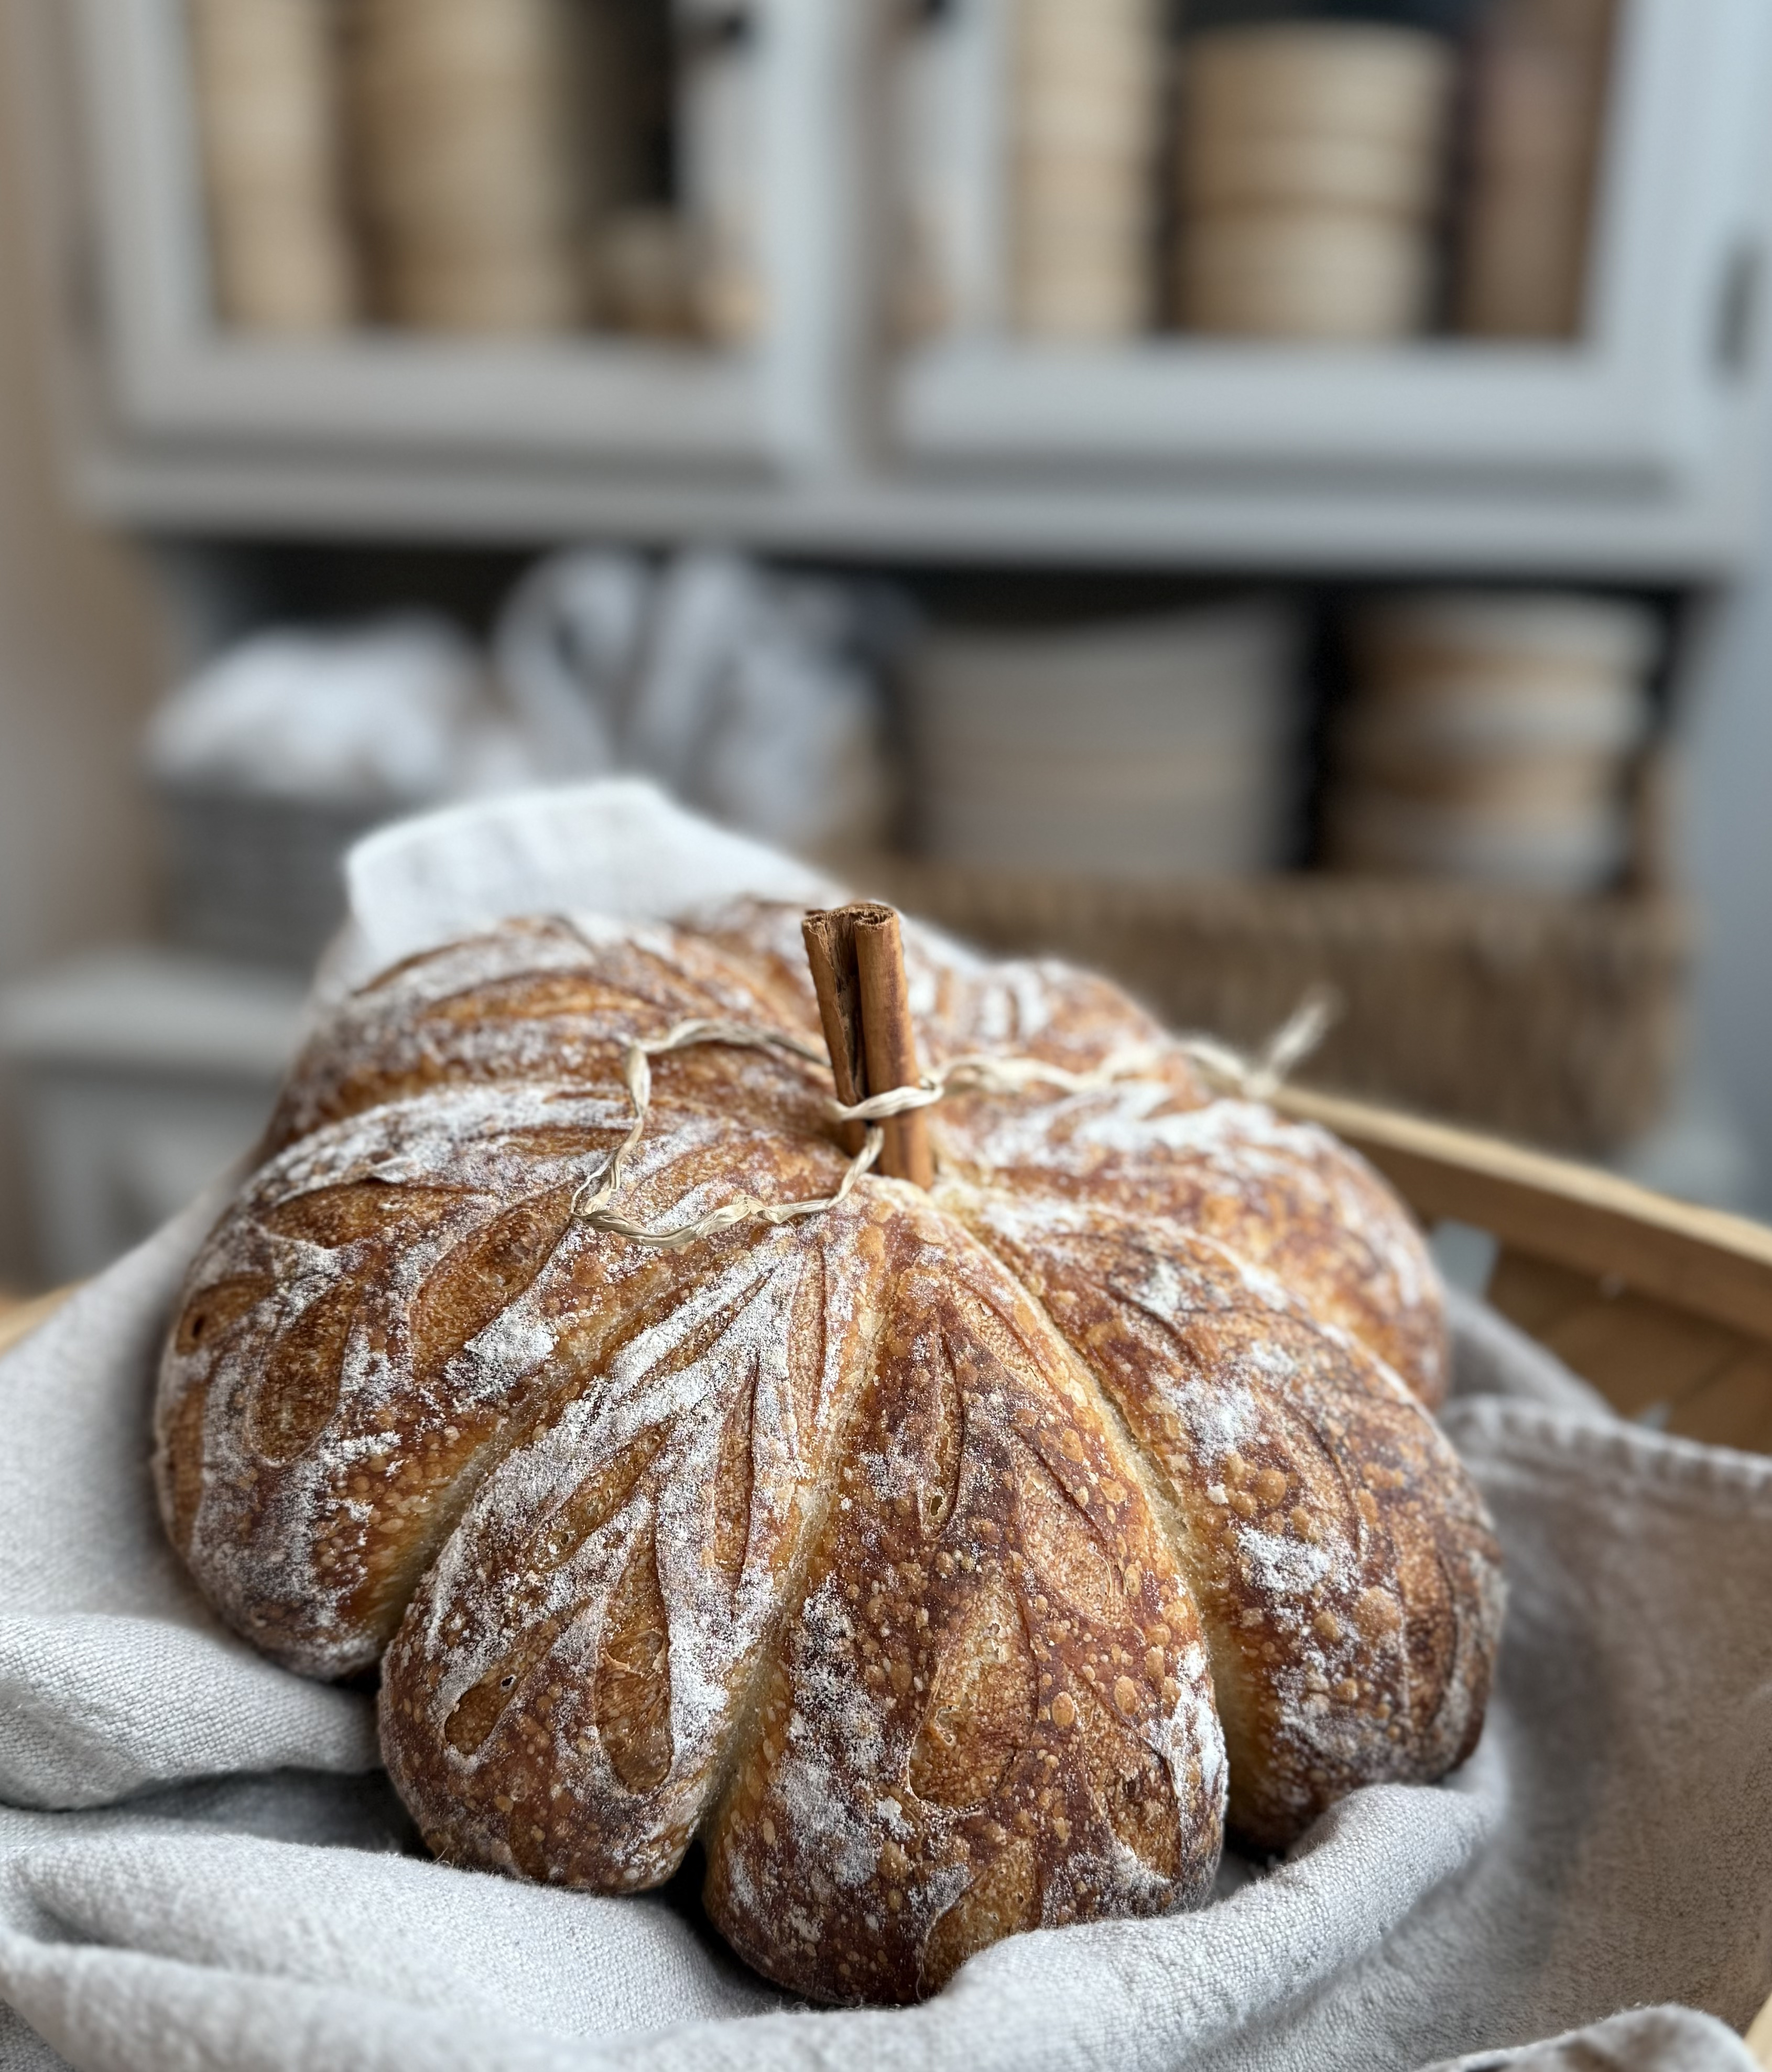
Step Five. Dusting the top of the loaf. This is what will give your scores more contrast, as your loaf expands and they open out. So this is going to be a heavier dusting than in the previous step. In this example, we used plain flour for a more low-key rustic look. For higher contrast, you can use rice flour, or a blend of both. If you want really high contrast, you can mist the top of the loaf with water before adding the flour.
Step Six. Time to tie! Simply pick up both ends of a single twine and bring them over the top of the loaf to tie a knot at the center. Take care not to tie too tightly, because the loaf is going to grow some, and if the twine is too tight, growth will be restricted and the loaf will likely split. Use any fast knot you like (so no slip knots), just make sure you leave enough slack to get a thumb comfortably under the tied twine. Once tied, snip off any excess, and move onto the next twine. Repeat twice more, until you are all tied up!
Step Seven. Scoring. Because the scoring on this loaf is largely decorative - ie. very shallow surface cuts, rather than deeper expansion scores that you’d use to produce an ear, we need to ensure that there are enough cuts to allow for expansion. Otherwise the loaf will rupture in unexpected places, or overgrow the twine, spoiling your pretty patterns. So we are going to score all 8 of our sections. In the video, you’ll see we did the same pattern on every section, but you might want to get fancy here, maybe choose two designs and alternate as you score around the loaf. As you score, you can turn the parchment round to bring the panel you want to work on right in front of you.
Let’s talk about scoring technique for a minute. You may have the best lame in the world, but if the way you approach scoring is not confident and controlled, you will end up disappointed at some point. Likewise, you may be a Scoring Champ, but if your blade is blunt, or your lame is of flawed design, you too will end up disappointed. You may not care much either way, but for those that do, here’s my advice: Get yourself a tub of Play-Doh, and the best lame on the market, and practice! And if you’re wondering what the best lame on the market is, for my money it has to be the Wire Monkey Goose Lame. In fact, we love it so much, we collaborated to create a Sourdough Geeks x Wire Monkey - Limited Edition Goose Lame - see if we have any left in stock.
So back to prettifying our pumpkin. We went for an off-set chevron design, making shallow but clean and even cuts until every section/panel was done.
Step Eight. Bake off your loaf. We used a baking shell, but a Dutch oven works just as well. Set a timer for 20 minutes. Remove your shell or uncover your Dutch oven at the 20 minute mark to begin color development, and bake for a further 15-20 minutes, depending on how dark you like to go!
Remove from the oven, place onto a cooling rack, and let your loaf cool.
Once cool, take a cinnamon stick, and insert it in the top center as a pumpkin stalk. You may need to use a small sharp knife to cut into the crust a little before doing so.
Et voila!
Here's the recipe for a 900g Moderate Hydration Plain Sourdough Loaf, for you:
Happy Fall Y’All!
🤓 LEVEL UP YOUR LOAVES! Join Sourdough Geeks' BAKERS CLUB and unlock the good stuff: courses, guides, downloads, live bake-alongs, secret recipes, tasty discounts, our private geek community, and BREAD TALK — our twice-monthly, video meetups. It's all there waiting for you.
👉 Not quite ready to go full geek? No worries — you can still snag our Mastering Sourdough Starter course for just $19.99 here.
🤓 LOOKING TO LEVEL UP & BAKE BETTER BREAD? ✅
Join Sourdough Geeks' Bakers Club and unlock the good stuff! Resources, events, and connection, all within a private space. It's right there waiting for you!
